
I have started Littleheart's costume for Purim (a Jewish holiday where all the kids get dressed up). After being a dog her first year

and a rainbow sunshine her second year (see tutorial here)
.JPG)
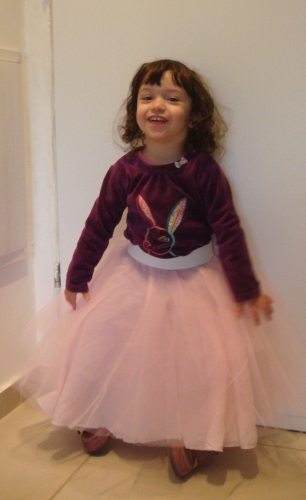
I decided that it was time to be a princess. I looked around the internet for some inspiration, and decided to make her a princess dress with a separate tutu under it, so that Littleheart would have the tutu after Purim to play dress-up. She doesn't have any dress-up clothes yet, but I think this is the time to start her a dress-up box, so this will be the first item in her box!
I haven't started the dress part yet, and I will definitely post about it, but today I want to show you how I made this circle skirt tutu. I made it long, since it goes under a princess dress, but you could make a shorter one if you are just making the tutu by itself.
What you will need:
Soft cotton or knit fabric for the underskirt
Tulle
Wide elastic to fit your child's waist
The amount of fabric really depends on the size of the skirt. You need one layer of your cotton/knit and 5-6 layers of you tulle. My Circle has a radius of about one meter, so I used one meter of the cotton and 2 by 3 meters of the tulle.
For the tulle it really depends on the width of the tulle. First make your pattern and then calculate how much you need...
First make your circle skirt pattern. As always, I used this great template from the scientific seamstress. I made four templates and taped them together so I would have a full circle, since I figured it would be easier that way with the tulle. But you could do it the traditional way too, using just a fourth of a circle.
1. Cut out one circle of your cotton or knit fabric. The reason I put one layer of soft cotton is so that the tutu will not scratch. Tulle is kind of rough, so with the cotton layer on the bottom, the tulle does not tough the legs.
2. Cut out 5- 6 circles of tulle. Now I thought I bought just enough tulle for the skirt, so I had 2 meters of 3 meter tulle, but in the end it seems like the lady at the store wasn't honest with me (or maybe just made a mistake? I hope so...) and the tulle wasn't really 3 meters long. So I didn't have enough to make 6 entire circle. In the end I cut out 4 full size circles and two smaller ones. I put the small ones in the middle, so they would give fullness, but wouldn't really show. I think it worked out that way...

Don't forget to cut out your hole...it is easiest my folding the circle into fourths like on the picture...

So when you have all your layers (6 tulle and one cotton) then place them on top or each other, with the cotton on the bottom. Pin them together at the hole and carefully stitch around the hole, making sure you have ALL your layers under the needle. This step is just to get all those layers together, so they don't slip around when you sew them to the elastic.

Now sew your elastic into a hoop, according to your waist size (Littleheart's is about 20 inches)
Sew in your elastic, following these instructions from MADE (if you are not new to my blog, you know by now that I refer to this tutorial for all my circle skirt remix tutorials. It is a great tutorial on how to make a circle skirt, and once you have it mastered, the possibilities are endless).

And voila! Your circle skirt tutu is done!


Stay tuned for the dress part of the Princess costume....

Beautiful little Princess and adorable tutu :-)
ReplyDeleteThank you Helen!
DeleteSorry, that was me (Mira) using a different account...Anyway, thanks!
DeleteAdorable tutu and sweet little girl!!! Love all photos! I'd love for you to visit my blog.
ReplyDeleteHave a great Year!
Hugs from Portugal,
Ana Love Craft
www.lovecraft2012.blogspot.com
Thank you Ana! I checked out your blog, it looks amazing! I want to spend some more time later "looking around"...
DeleteAwesome!!!! Great tutorial!
ReplyDeleteThanks ReAnna!
DeleteI love it!!!! Please share at my linky party going on now at http://wallisfarmsdailywalk.blogspot.com/2013/01/linky-party-2.html Thanks!
ReplyDeleteGreat tutorial! I can see a lot of these in my daughter's future! Thanks for linking up with Sew Cute Tuesday:)
ReplyDeleteYour daughter is going to have LOTS of fun with her tutu, MIra. Great idea to add the soft layer under the tulle.
ReplyDeleteIt is sooooo cute! My girls would die with happiness. I've pinned your tutorial so I can make them one. Thanks for sharing!
ReplyDeleteOh fun, I hope you make one!
DeleteHi, great post. I found you through the blog hop. Please stop by and say hi when you get a chance. .Be sure and check out my new Blog Hop that started. It's Weekly Goals Link Up. It's a great way to stay on track. Have a great day. :) Now following you. Here's the link for it if you would like to check it out.
ReplyDeletehttp://lenettacarnes.blogspot.com/2013/01/weekly-goals-linkup.html
Lenetta
Thanks, Lenetta, I will check it out.
DeleteTHANK YOU so much for this tutorial! I'm going to make one for my girls!
ReplyDeleteGretta Hewson
New Braunfels Injury Attorneys