
Here is the rest of the baby presents
I made for my friend’s baby girl (the first one was a Black Apple doll).I love how the set turned out, and it is nice and girly!
The overall is a pattern for the ottobre magazine 4/2012. I
added the lace around the chest, to make it real girly (her first child is a
boy, so this time around she needs lots of lace and ruffles!).
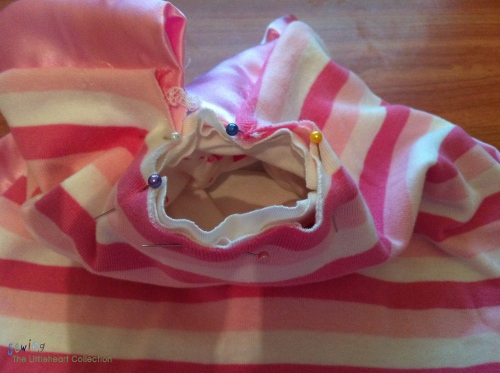
The hat is a free pattern from Zaaberry. This is a great
tutorial, and really easy. I lined the hat so there wouldn't be any rough seams
on the baby’s head.
The bunny is my own creation and the tutorial appeared on Gritsand Giggles in December for a “Becoming Mommy series”. I am bringing the
tutorial “home” in case you missed it…

Hi, my name is Mira and I am so excited to be part of "Becoming Mommy" here at Grits & Giggles. I blog over at Sewing the Littleheart Collection and this is my first guest post!
I am a mom to my two year old daughter, and thanks to her, I have discovered my passion for sewing. My biggest joy is sewing clothes (for my daughter and for myself). So far, most of my tutorials are clothes for toddlers, since this reflects my current needs. But I do have one fun baby project I call the: "Decorative Wall Protector for little Squirters". It is a washable wall hanging for the nursery which serves to protect the wall from squirts during a changing or wash.
Today I am going to share a project with you very close to my heart. When I was a little girl, I had this bunny softie I loved. My parents actually bought me 6 of them, because I would not go anywhere without it. The bunnies were a big part of my childhood, and accompanied me everywhere.
I have lots of pregnant friends at the moment, and decided I wanted to recreate the bunny, so I can make some presents, and perhaps give these new babies the same security, my bunnies gave me.
I took my old bunny as a base for my pattern (or whatever was left of the bunny) and recreated a soft, modern version of it. The bunny is not too hard to make (it can be made in one evening) and it is soft and snuggly - perfect for a new baby. I like that it is small, so it can be stuck into a purse if needed to, but it is more unique than just an ordinary little blankie. I made this one pink, but you can definitely make it any color for boys and girls!
Would you like to make one of your own? Just follow my instructions and you will have one in no time!
What you will need
1/4 yeard soft, white/beige/light pink knit fabric (for the head and hands)
1/2 yard soft, knit printed fabric
A very long band of matching satin.
Cutting
Cut two body pieces on the fold from your main fabric.
Cut 4 Head pieces on the fold from you white fabric (you could do 2, but I wanted the head to be a bit thicker, so I did 4)
Cut 8 hand pieces from you white fabric (same reason as head)
Cut 4 ear pieces from you main fabric.
Cut a strip of your satin, 2.5 inches wide, as long as you can. Or use a satin ribbon or binding that you buy as a strip. My satin was not long enough to go around the entire bunny, so I had to sew two strips together.

Sewing
Sew two ear pieces right sides together, using 1/4" seam allowance. Do not sew across the straight part on the bottom. Flip the ear right sides out and topstitch around the ear. Do the same for the other ear.

Sew the hands together in the same manner (with you hands you are sewing through 4 layers, not two). You don't need to topstitch the hands.

Now make the face. You can really do it anyway you want. I made the nose with embroidery thread and I drew on the eyes with a fabric marker. For the cheeks I cut out two small circles out of pink knit fabric (so it doesn't fray) and hand sewed them on. If you cut out four pieces for the head, then you will be sewing the face through two layers. I would stick to applique and embroidery, since the bunny is meant for a baby, so you don't want any buttons that can pop off.

Take two head pieces (without the face) and put them on top of each other, right sides up (straight part on the bottom). Then place the ears on the top, one on the left and the other on the right. Have them looking down (see picture). If you line up the straight part of the ears with the edges of the head, your ears will automatically cross over, like on the picture.
Then place the other two head pieces on top, right sides down (the face lookin down, make sure that the eyes are up and the mouth is down!). Pin in place. Make sure you pin the ears too. Then sew around the head, sewing all the layers together. Keep the bottom of the head open. Trim seam allowance close to seam and flip. Press.

Now place your hands on the sides of one body piece (where the pattern is marked "place hands here"), lining up the raw edges with the raw edges of the body, and pin. The hands should be facing "in".
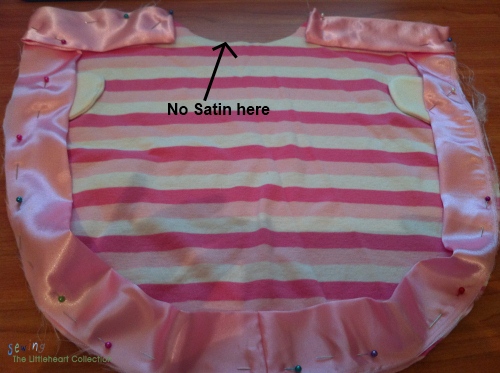
Take your strip of satin and fold it in half on the long side and press. Now pin it to the right side of the body piece, lining up the raw edges. Do not pin the satin to the rounded part at the top, where the head is attached.
There are two tricky parts to this project. The first are the corners. Make them like you would be sewing binding to a blanket. Make sure you leave enough material at the corner, so when you flip it right sides out, the satin band will go smoothly around the corner. I had to do it a few times before I got it right....

Leave edges at neck for now, we will get to them at the end.
Now place the other body part on top of the first body/hand/satin piece. Take out one pin at a time and repin through all the layers.
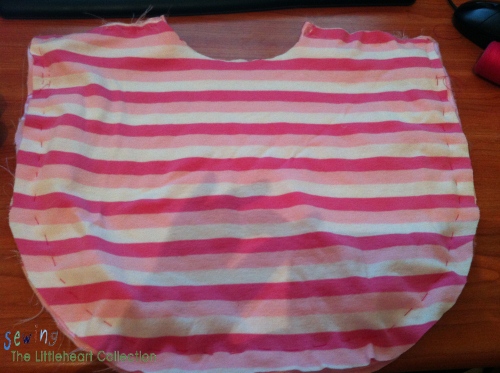
I hand stitched around the entire thing to make sure everything was in place. Now sew around (leaving the rounded part at the top open). Serge or zigzag around again.

Now flip right sides out.

Now comes the second tricky part.
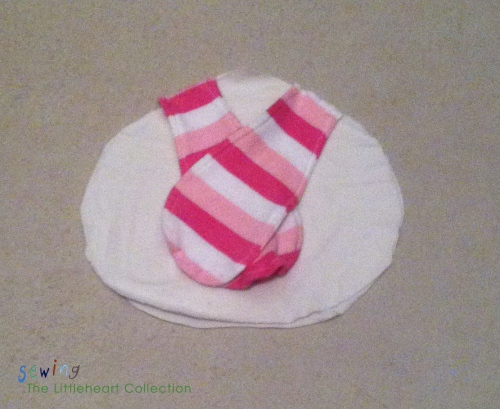
Lay your body part down, and fold over your hands like shown in the picture.

Take the top of your body piece (the rounded part) and pin it around the opening of the head, so that the open part is in the front (where the face is). Make sure you line up all the raw edges. Pin only until the knit fabric is done, do not pin the satin.
Sew around the opening of the head. Make sure you get all the layers into your seam.
You will have a little piece of the head left between the opening of the body that is still "raw". Fold the two layers under and sew across.

Now fold the corners of the satin inward, so that the raw edges are sandwiched between the layers and stitch them down.

And voila! Your softie bunny is ready to be cuddled!


I will be linking up to some of the link parties on this page .

I love seeing the original bunny next to your recreation, very cute!
ReplyDeletelove the set! so sweet. brings back lots of memories
ReplyDeleteHOLA MIRA TE FELICITO, QUE DETALLE TAN TIERNO.
ReplyDeleteSALUDOS CARIÑOSOS
CARMEN
oh how sweet!! thanks for sharing
ReplyDeleteLove your article today. So cute. The bunny is a wow! My kids had the FisherPrice bunnies just like that back in the early 80's. We received two for each my son and daughter. Three of them are in shreds (yes kept packed all nice in the keep box, but am finally tossing them as I downsize)and one is in sad shape, but I kept it as a pattern incase of grandkids. But, your pattern is exactly the same and so adorable! Thank you so much for sharing. I will be making some and packing them away for the hope of grandkids in the next year or so. You are a wonderful sewer!
ReplyDeleteI LOVE your softie bunny, Mira!!! And as always, a comprehensive, easy to follow tutorial.
ReplyDeleteHi Mira, I've featured your Softie Bunny today... Threading Your Way Features.
DeleteThanks Pam, I appreciate it!
DeleteSo cute! The bunny is adorable! I love the pink and white stripes!
ReplyDeleteT'onna @ Submarine Sunday Link Party
http://navywifeypeters.blogspot.com/2013/01/submarine-sunday-15.html
The bunny is so cute!! Thank you for sharing!
ReplyDeleteWe found you on the Six Sisters. You have some great ideas! We are having our 1st link party tomorrow (Thursday 1/24/13) We would love to have you come and link up. We have a fun blog joining us. We hope you will join us too @ the busybhive.blogspot.com
ReplyDeleteHave a great day!
Joye & Myrna
Overall and bunny are so cute.
ReplyDeleteCorina from germany
I keep seeing this bunny and have pinned it already and can't believe I never commented. I love it! Such a cute little guy and a great walkthrough. It's adorable seeing it next to the older one too. Great job!
ReplyDeleteThank you for your tutorial. Very good job! I know of several babies that are going to get their own Softie Bunnies!
ReplyDeleteThis is very cute! My grandson would just Love this! I shared this on my blog with a link back to your blog for the tutorial. Thank you so much! ~Yolanda~
ReplyDeleteI had one (more like three) in yellow growing up. Thank you for the tutorial, I will be making one for my future kids.
ReplyDelete